Everyone hits a bull’s eye every now and then. For an archer, consistency is key, and way more important than the location of the arrow. Because, if you can shoot an arrow at the exact same point every time, you only will need to adjust your sight. Below you will find 10 steps to help you get this consistency, explained step by step.
Important note: These steps are no golden rules for a perfect shot, and they aren’t even rules. They are good guidelines for a good shot, but you can learn your own method/technique if it works better for you.
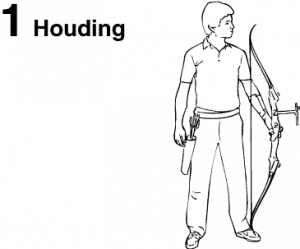
A good posture is not only important for a good shot, but it’s also important to prevent injuries.
- Stand perpendicular to the shooting line in front of your target. An imaginary line perpendicular to the shooting line should point to the middle of your target
- Your feet are a shoulder length apart.
- Stand up straight, straighten yourself, but keep relaxed. Make sure you don’t lock your knees, and lower your shoulders.
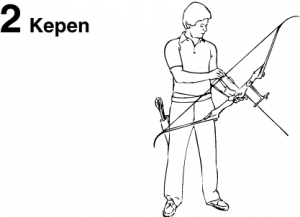
- Grab an arrow at the tip, and slide it on the arrow rest of your bow.
- Make sure the index feather (the one with the odd color) is pointing towards you, and away from the bow.
- Click the arrow in between the 2 nock points on your string.
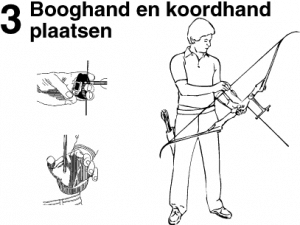
- You tilt your bow hand 45 degrees from the bow. (So that the line of your knuckles make a 45 degree angle with the bow, which keeps straight)
- Your wrist and fingers remain relaxed (on the bow hand). When you raise the bow (step 5), you will pull the bow into your hand, and not hold it!
- Don’t forget to tighten the sling around your fingers (thumb and index/middle finger), so the bow doesn’t fall out of your hand.
- The pull hand (the one you pull the string with) is wearing an anchor tab. Put your fingers, with the leather in between, around the arrow, by putting your index finger above, and your middle and ring finger below it.
- Use your fingertips to hold the string. Some archers prefer to ‘hook’ the string in the first joint of your fingers.
- Make sure there is room between your fingers and the arrow. This prevents you from tilting the arrow off the rest during the drawing of the bow.
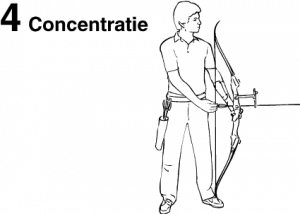
Concentration is the thing that makes or breaks a shot. An archer focusses mind and body on making the perfect shot.
- Relax and trust on your technique. Don’t try to control every part of your shot, but let it go. It’s just like cycling: If you think too hard about how you should make a turn, you will topple over. So try to focus only on a few things to improve at a time.
- Concentrate on yourself and your target, and ignore everything else (except for maybe the trainer)
- Don’t think about your previous shots, whether they were good or bad. Treat every shot as a new match.
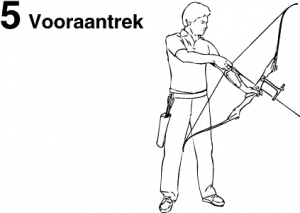
- Pull the string lightly, 5 to 10 centimeters is plenty.
- Pull the bow into your bow hand like explained in step 3. So don’t hold the bow, the string will do that for you.
- Raise the bow, pointing at your target. Make sure the shoulder of your bow hand remains low, and keep your arm turned away, so you don’t hit it when you release the string.
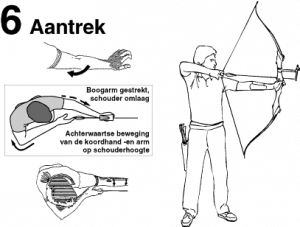
- The most important thing is that you don’t draw from your biceps (your arms), but from your shoulders. Push your shoulder blades back and towards each other.
- During the draw, you don’t only pull the string towards you, but you also push the bow away from you. Make the distance as big as possible (without overstretching your arm), so it is easy to replicate the exact same shot.
- Keep your elbow of the draw hand high, as shown in the picture. This way you give your shoulders the freedom to make the correct movements, and prevent your biceps to pull the last bit.
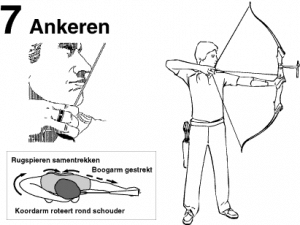
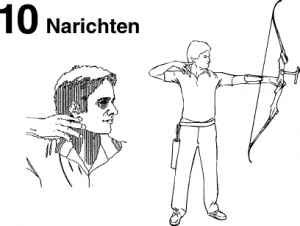
- Put the plate of your anchor tab underneath your chin and pull it against your chin, and keep pulling it ‘into’ your chin. Keep your mouth closed.
- Make sure the string touches the middle of your chin and the middle of your nose.
- Make sure your posture doesn’t change at all. Bring the string towards you, don’t bring yourself towards the string.
- Next up is aiming.
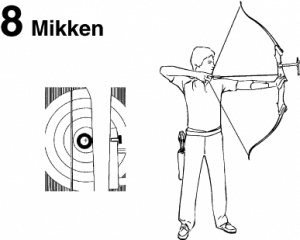
- First make sure your bow is stable and not moving, by anchoring properly and relaxing. Then calmly move the vizor to the middle of the target.
- Make sure you line out the vizor correctly like shown in the picture.
- Only when the vizor is resting on the yellow, you move on to the next step.
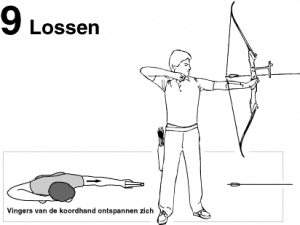
- We have come to the release of the string (and the arrow).
- The release is nothing more than the relaxation of the fingers of the draw hand, such that the hand ‘glides’ off the string. This motion is a passive one, so you don’t force your fingers outwards.
- Because of the force on the string, the arrow flies towards the target. At the same time, your draw hand flies backwards, due to Newton’s third law: ‘Each action has an equal and opposite reaction.’ Don’t keep your draw hand under your chin, but let it fly back.
- Keep holding the same position until the arrow hits the target. The most important thing here is to not let your bow arm drop.
- Because you aren’t holding the bow, the bow will topple back or forwards (depending on the center of mass). Let this happen and don’t grab the bow; if you put on the sling correctly, it will catch the bow for you.